
40% of consumers depend on influencer recommendations.
Influencer marketing has become big business. More and more brands are seeing the impact a well-placed influencer endorsement can have on their bottom line.
So much so 89% of marketers say ROI from influencer marketing is comparable or better than other marketing channels.

Influencers are especially important when you’re targeting a younger demographic on social media. According to one study, 70% of teens trust influencers more than traditional celebrities.
But before you hand over your hard-earned cash, you want to make sure you’re going to get a positive return.
The problem for many brands is tracking the impact of influencer campaigns when there are so many factors at play.
You can measure the reach of individual posts, but that doesn’t tell you anything about whether revenue was generated.
You can look at sales, but how do you track the numbers when you’ve got multiple influencers promoting your brand through multiple channels?
What you really want to know is: how much bang for my buck am I getting? In other words, for every dollar I spend, what am I getting back?
Jumper offers a number of ways to track the ROI of individual influencer campaigns.
These easy integrations and tools will allow you to prove whether or not a campaign was effective, see exactly where revenue is coming from, and refine your strategy going forward.
Let’s dive into the steps you need to set your goals, track your campaigns, and boost your bottom line.
How to Track Your Influencer Campaigns
Set Clear, Specific Goals for Your Campaign
Before you embark on an influencer marketing campaign, you need to figure precisely what you want to get out of it. All other roads lead to ruin.
Setting clear, specific, and timely goals will help keep your campaign on track and allow you to analyze its effectiveness.
Here are some typical goals:
- Increase brand awareness
- Strengthen brand identity
- Increase sales
- Increase engagement
- Lead generation
Of course, influencer campaigns can have an impact on all of these at the same time but it’s better to focus on one goal, especially when you’re starting out.
The key to tracking your campaigns effectively is to isolate the causes. If you don’t know where a spike in traffic, a surge of extra followers, or a rush of sales comes from you can’t learn anything from it.
That’s where Jumper comes in. It’s easy to set up hashtags not only for each of your influencers but for each product. This way, you can keep track of whichever are your key metrics measuring the exact impact each influencer has had.
So, define your one key goal and move on to the next stage.
Define Metrics to Track
As an ecommerce store, you’ll be pleased to know that Jumper is designed to focus on the more important metrics. Rather than vanity metrics such as likes, shares, and follower-count.
These figures are good for an ego boost and can give you an idea of how your brand is perceived.
But when it comes to determining the ROI of your campaigns you want to be looking at the real numbers. Choose metrics that will tell you whether or not you’ve achieved the goal you just set.
We’ll see later on how to track these metrics with Jumper. But for now, decide on the key metrics that you want to measure. My suggestion for most ecommerce campaigns would simply be the sales,revenue, and profit generated by each influencer.
Decide on a Payment Structure
Deciding how you will compensate your influencers is key to measuring the success of your campaigns. One half of the ROI equation is how much you have spent.
Whether you choose to give away free products in exchange for posts, or if you decide to pay for a certain number of posts, it’s important to keep track of the cost of running each campaign.
The total cost for each influencer can then be compared to the results. This allows you to determine whether your campaign was a success, and to compare each influencer’s impact to inform your decisions for future campaigns.
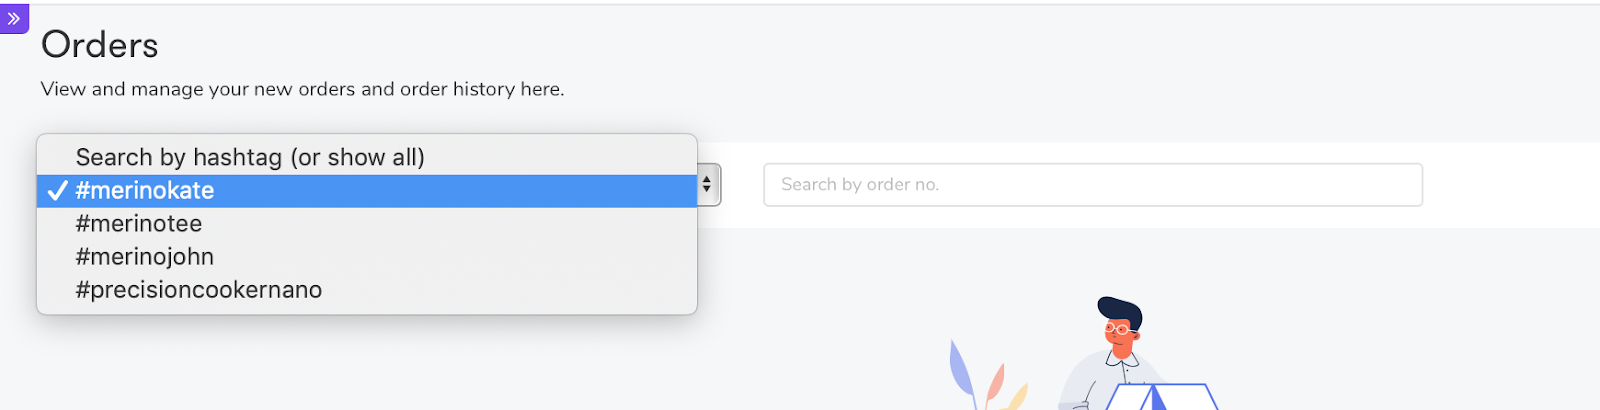
Use Influencer-Specific Hashtags
Now you’ve decided on your goals and which metrics to track, and know how much you’re spending with each influencer, you can go ahead and add product hashtags to your Jumper account.
In order to track each campaign separately, you need to create a specific hashtag for each product that each influencer is going to promote.
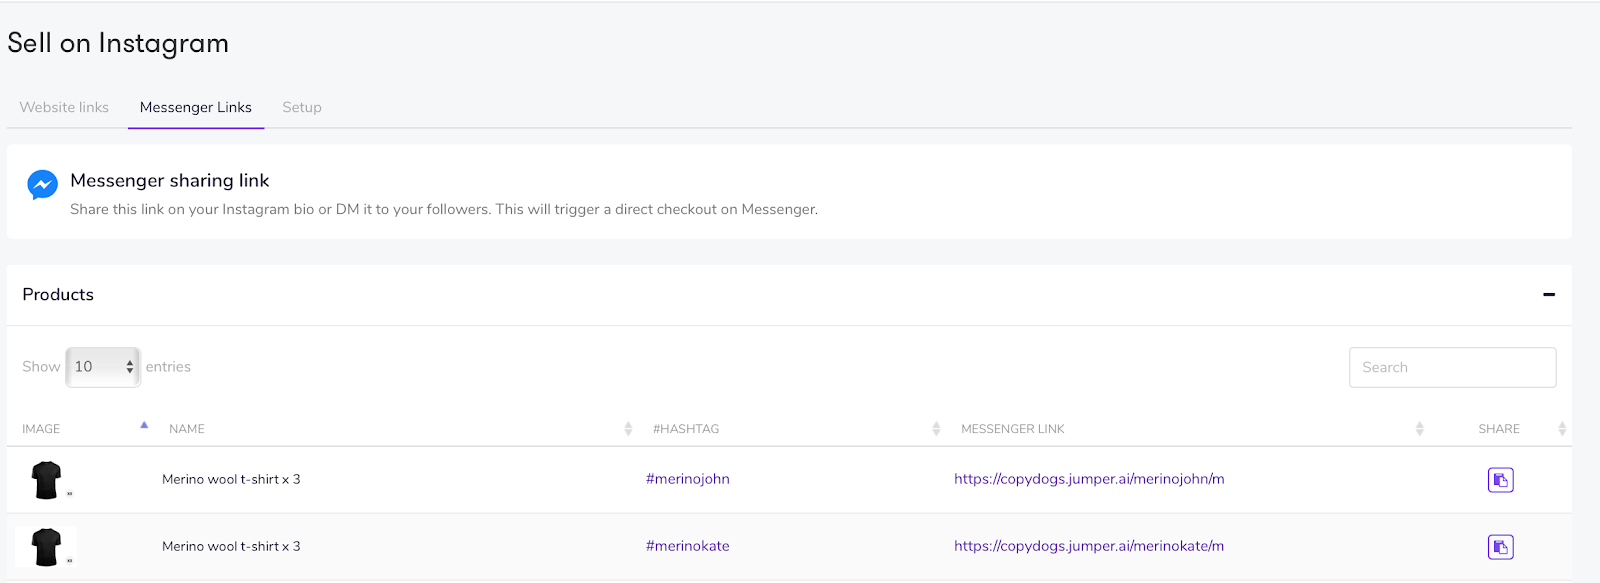
Let’s say you run a clothing store and you want to increase sales of merino wool t-shirts. You decide to use Jumper to compare the effectiveness of the two influencer campaigns. Your two influencers are John and Kate. So, you go for the hashtags: #merinojohn and #merinokate.
In your Jumper dashboard, navigate to Products and click Add new.

Here you can add all your product details, an image, and your unique influencer/product hashtag. Once you’ve added all the details, click on Save Product and you’re done.
Repeat this process for all the products you want to track for each influencer, creating unique hashtags for each one.
You can view and manage them from the Manage Products screen.

Use Offers to Track Results
Another way to track your results while encouraging more sales is to use discount codes specific to your influencers.
This is easy to set up with Jumper. Head to Products > Manage Discounts and click on Add Discount.
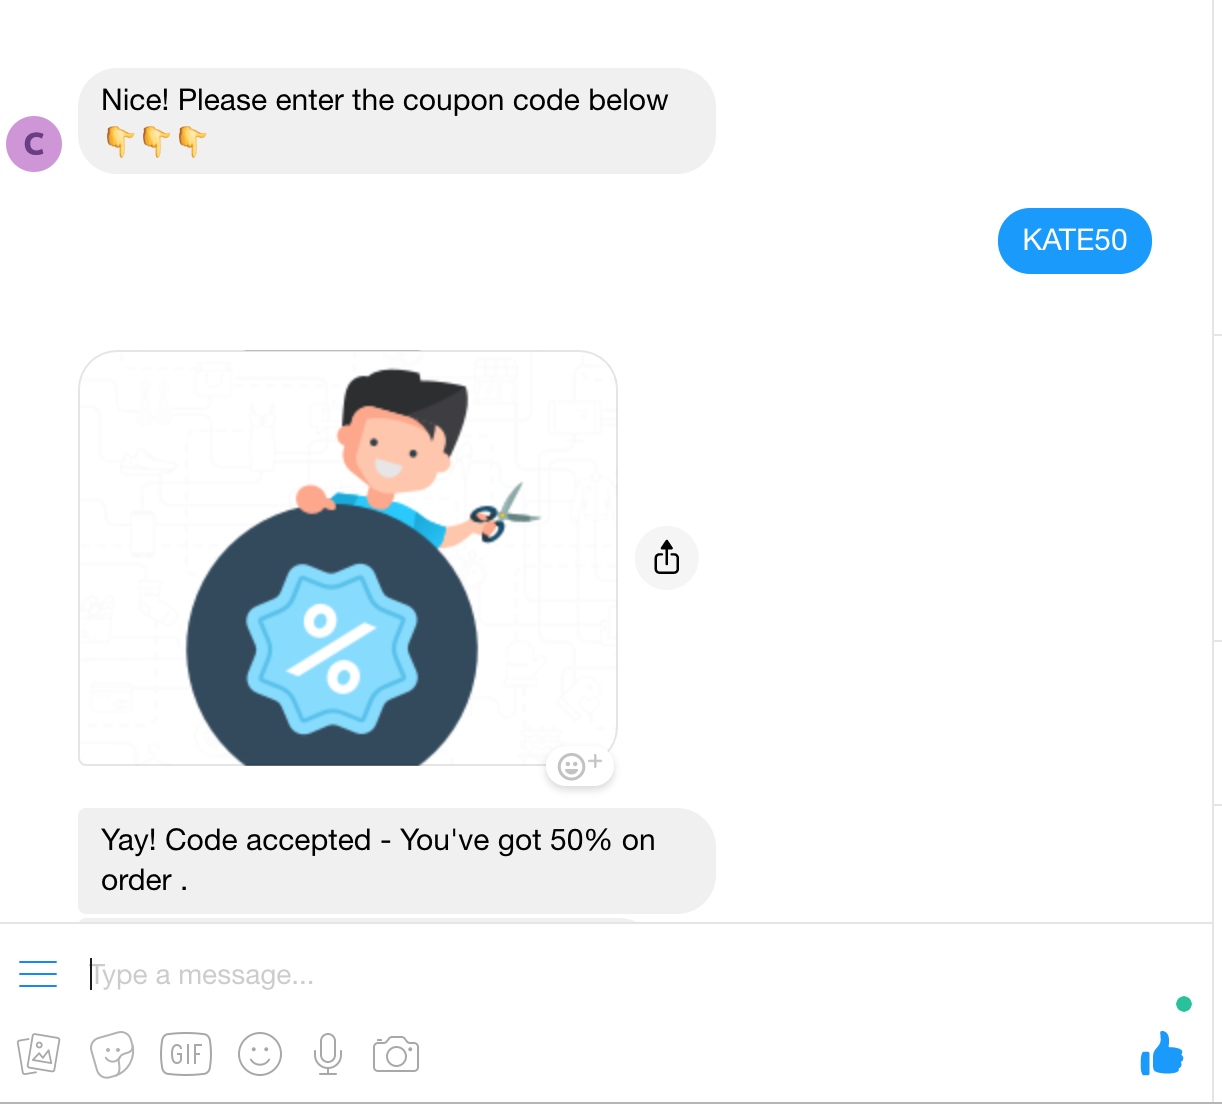
Use a discount code unique to your influencer so you can track the effectiveness of the offer later. Here, I’ve used KATE50 for a 50% discount.
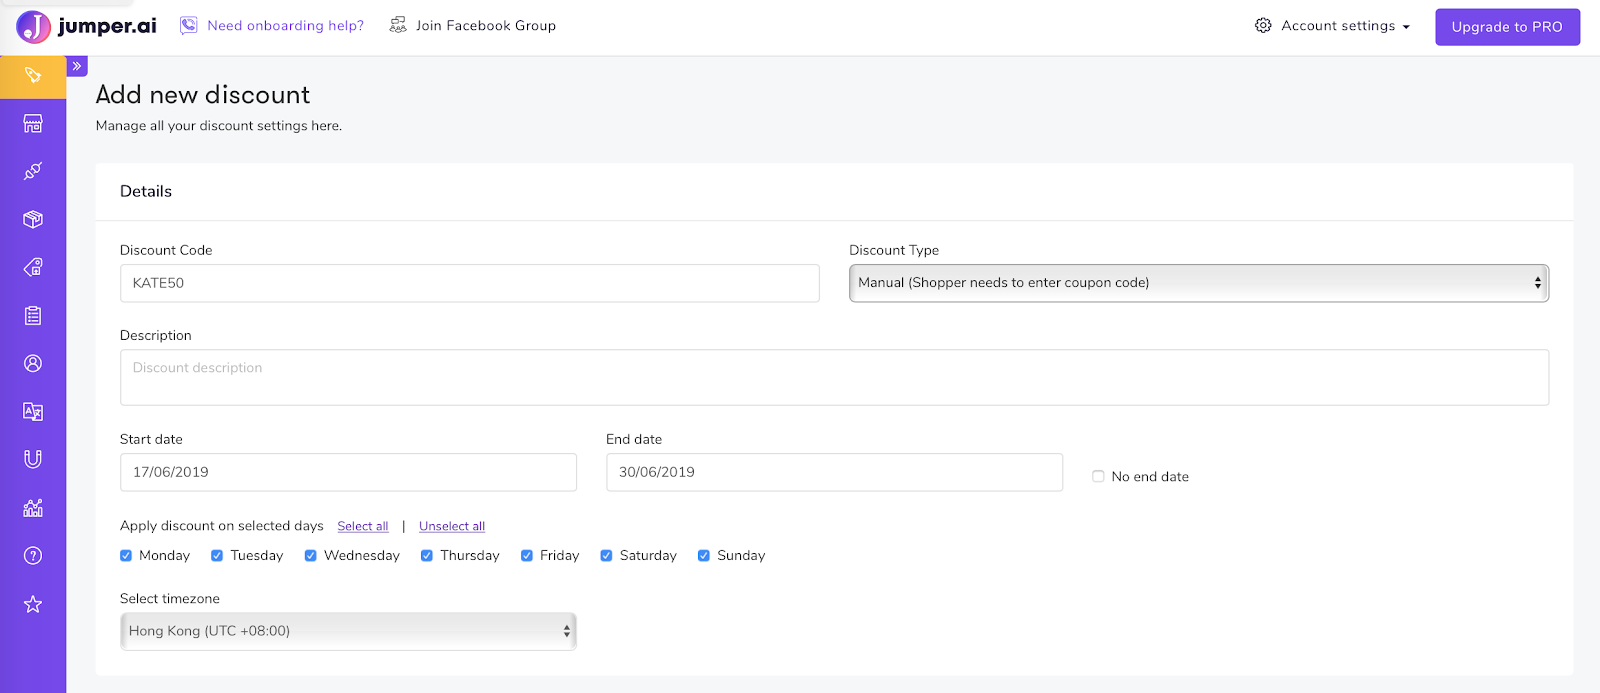
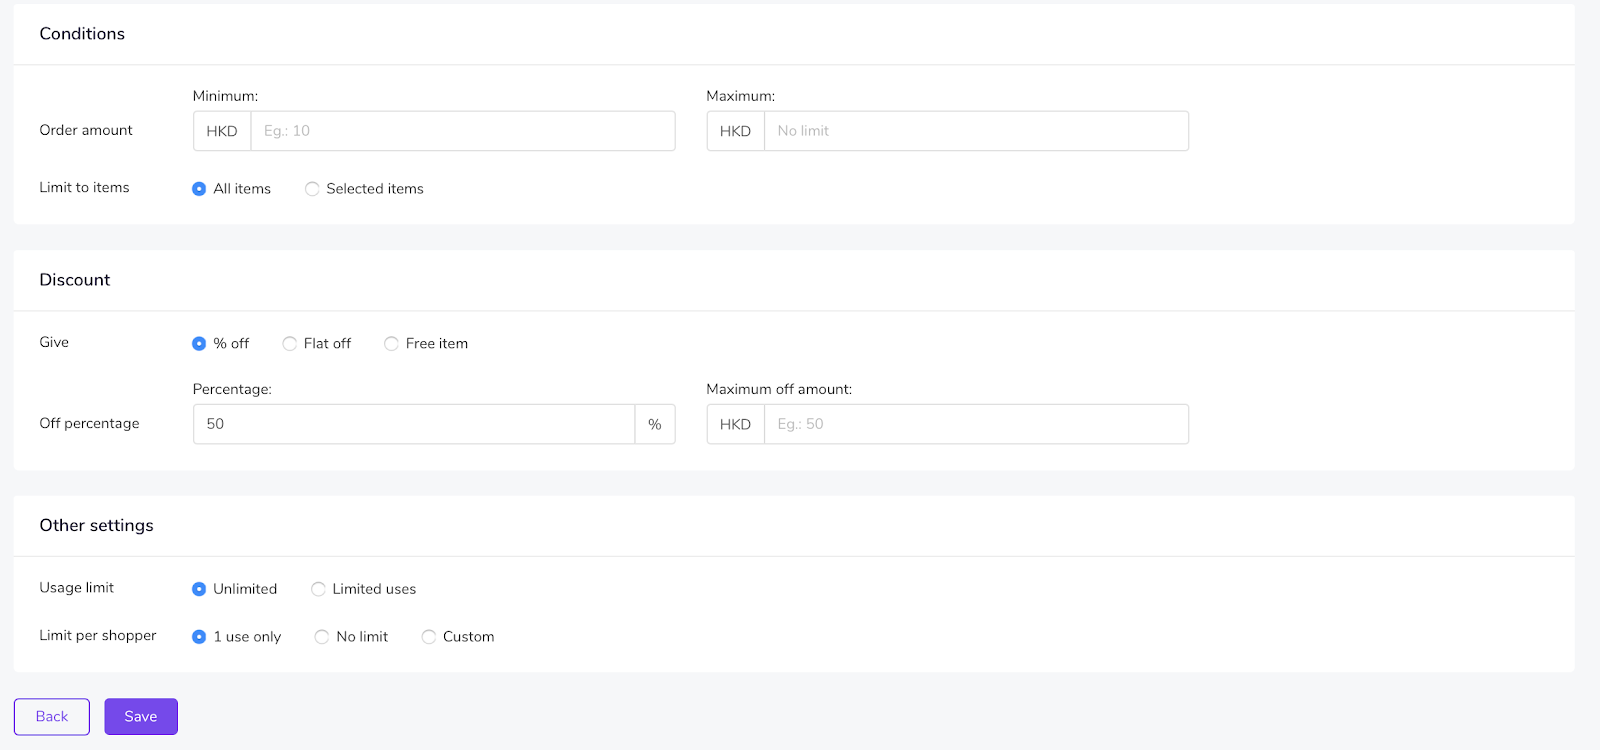
Then it’s just a case of adding any conditions you require in order to protect yourself from the overuse of the code. Fill out the amount of discount you want to offer and click on Save.
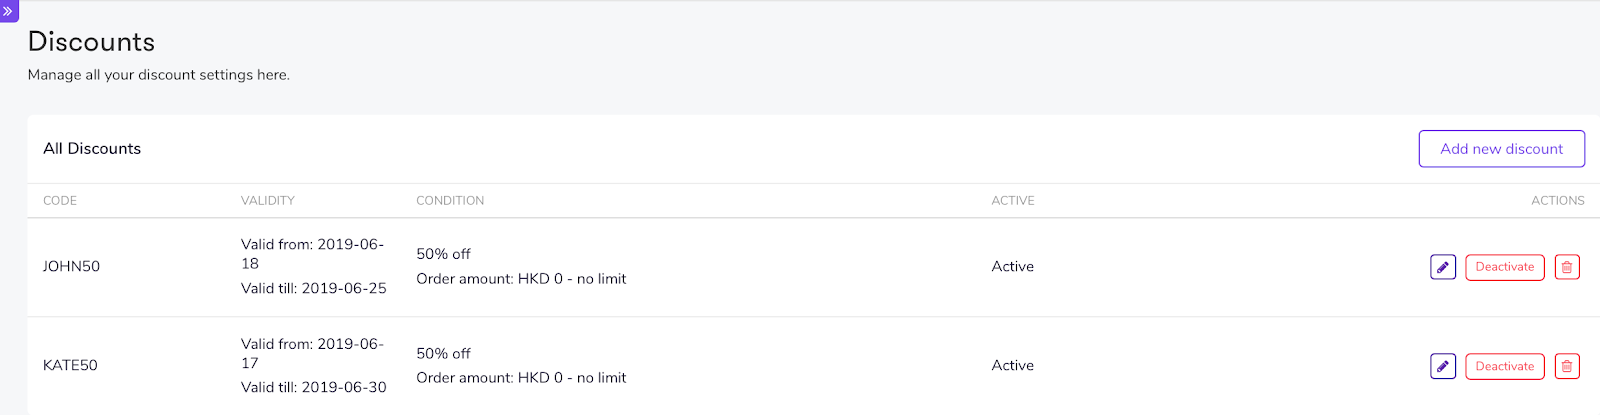
Once you’ve set up your discount codes you can manage them from the Manage Discounts screen.
Share Your Links and Codes with Your Influencers
Now you’ve set up unique hashtags and offer codes for your influencers, it’s time to share them and get your campaign rolling.
Navigate to the Manage Products screen and click on the Share button. A list of social platforms pops up. Here, you can choose the platform your influencer is using.

Click on the logo and Jumper will take you to the appropriate screen and walk you through the process for each platform. For this example, we’ll go with Instagram.
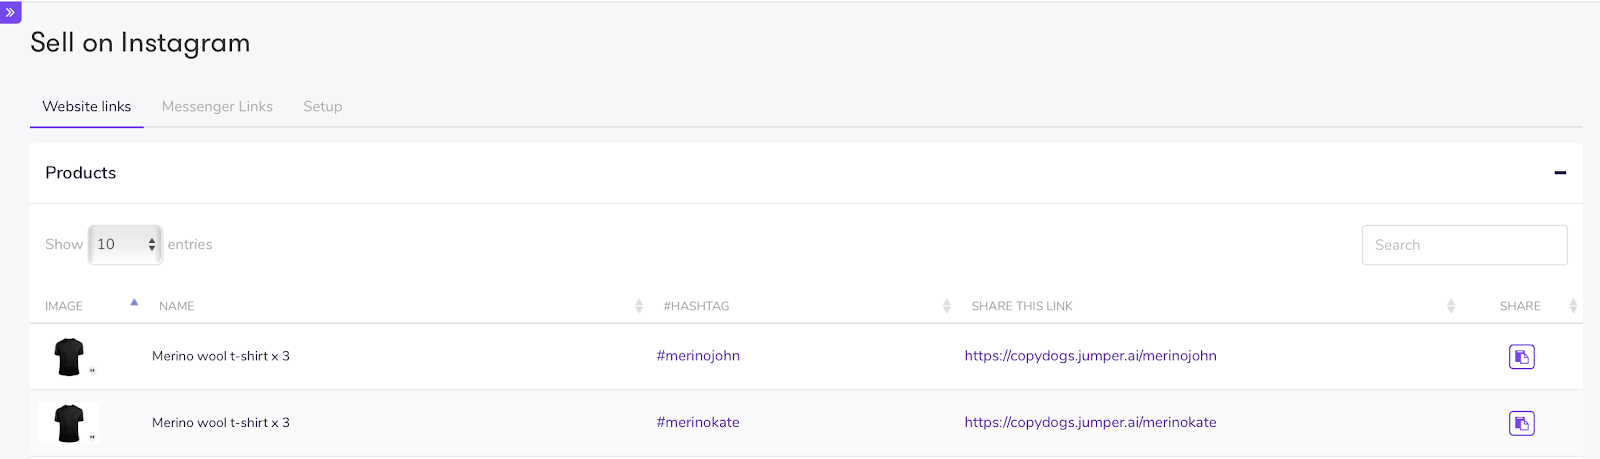
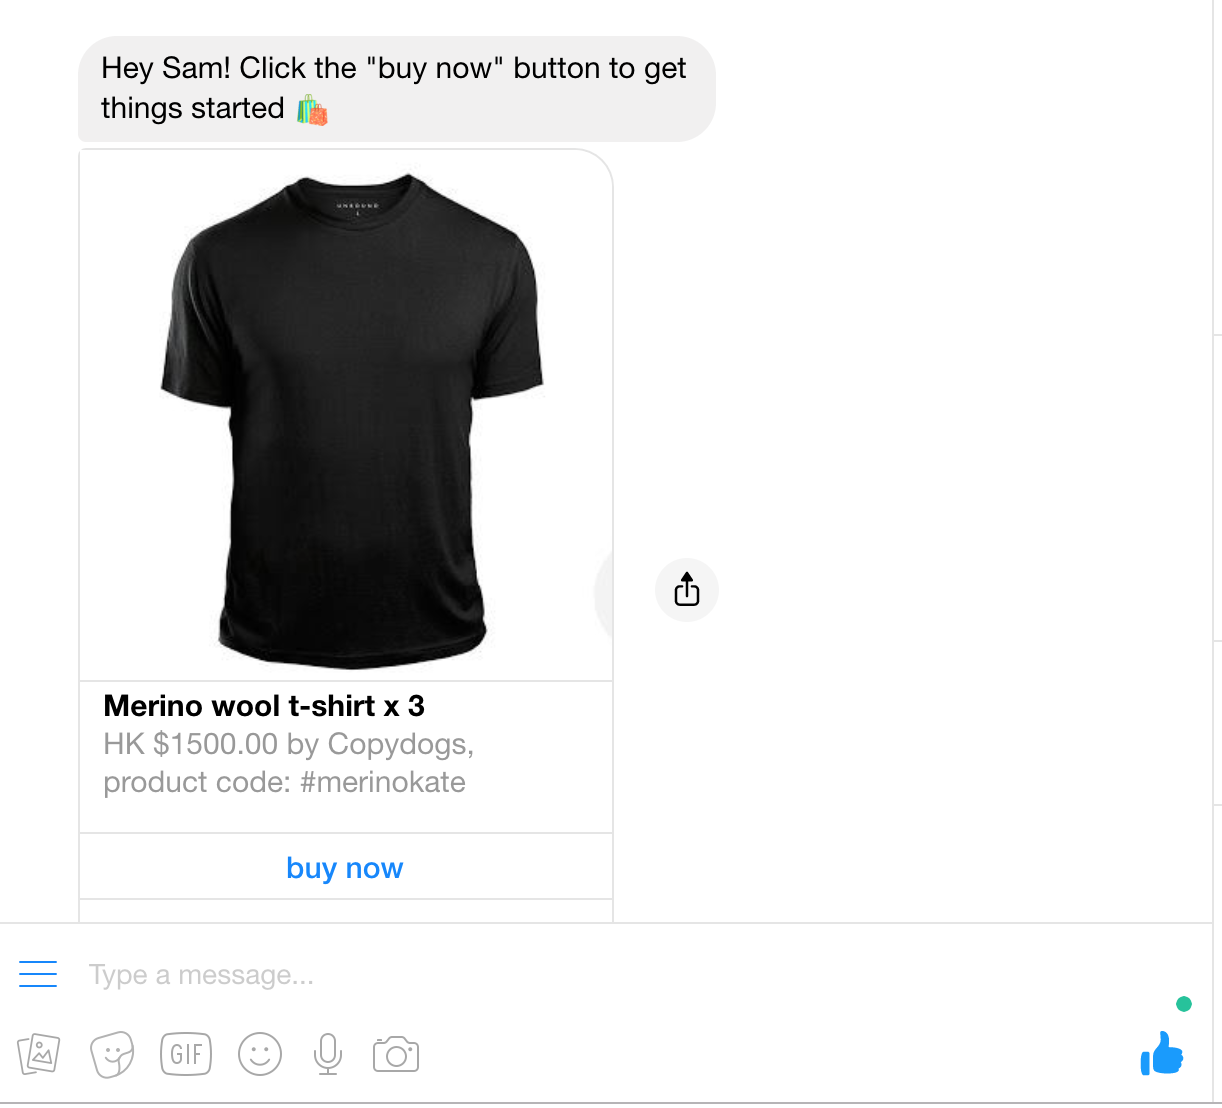
Simply share the links provided here with each influencer and they can include this in their bio or stories for users to click-through or swipe up.
If you want to share a link for users to directly check out through Messenger, click on the Messenger Links tab, and use the links provided.
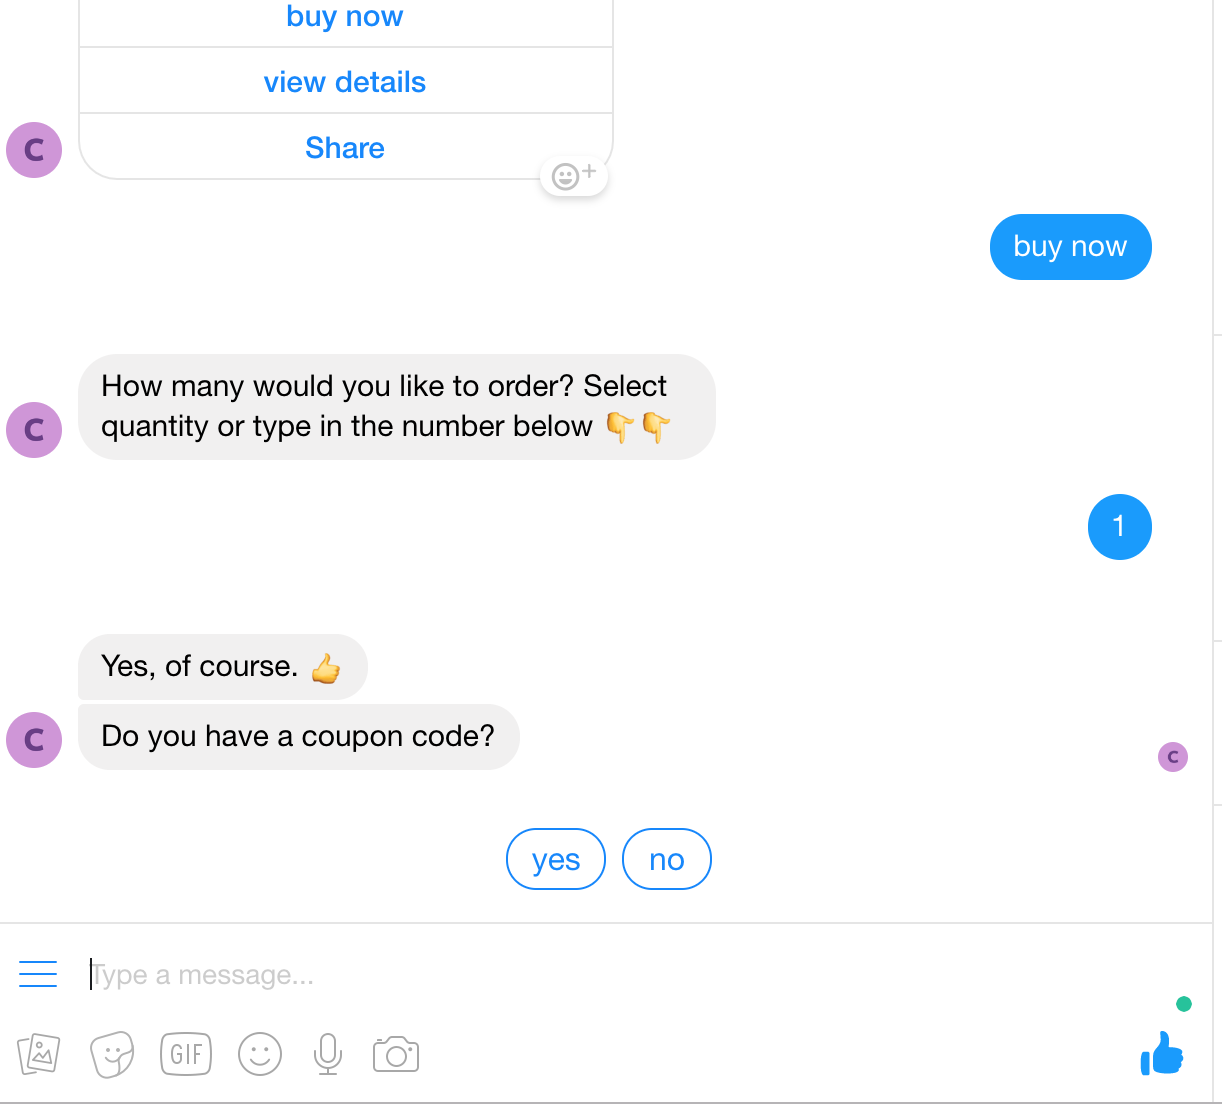
It’s as easy that! When your new customers click on the link or use the hashtag, they’ll be taken directly to your Jumper storefront, or straight to Messenger, where a chatbot walks them through checkout.
If you have a discount code set up, the user will be prompted to add the code. Jumper checks the code and automatically applies the discount.
Track Your Results with Jumper Analytics
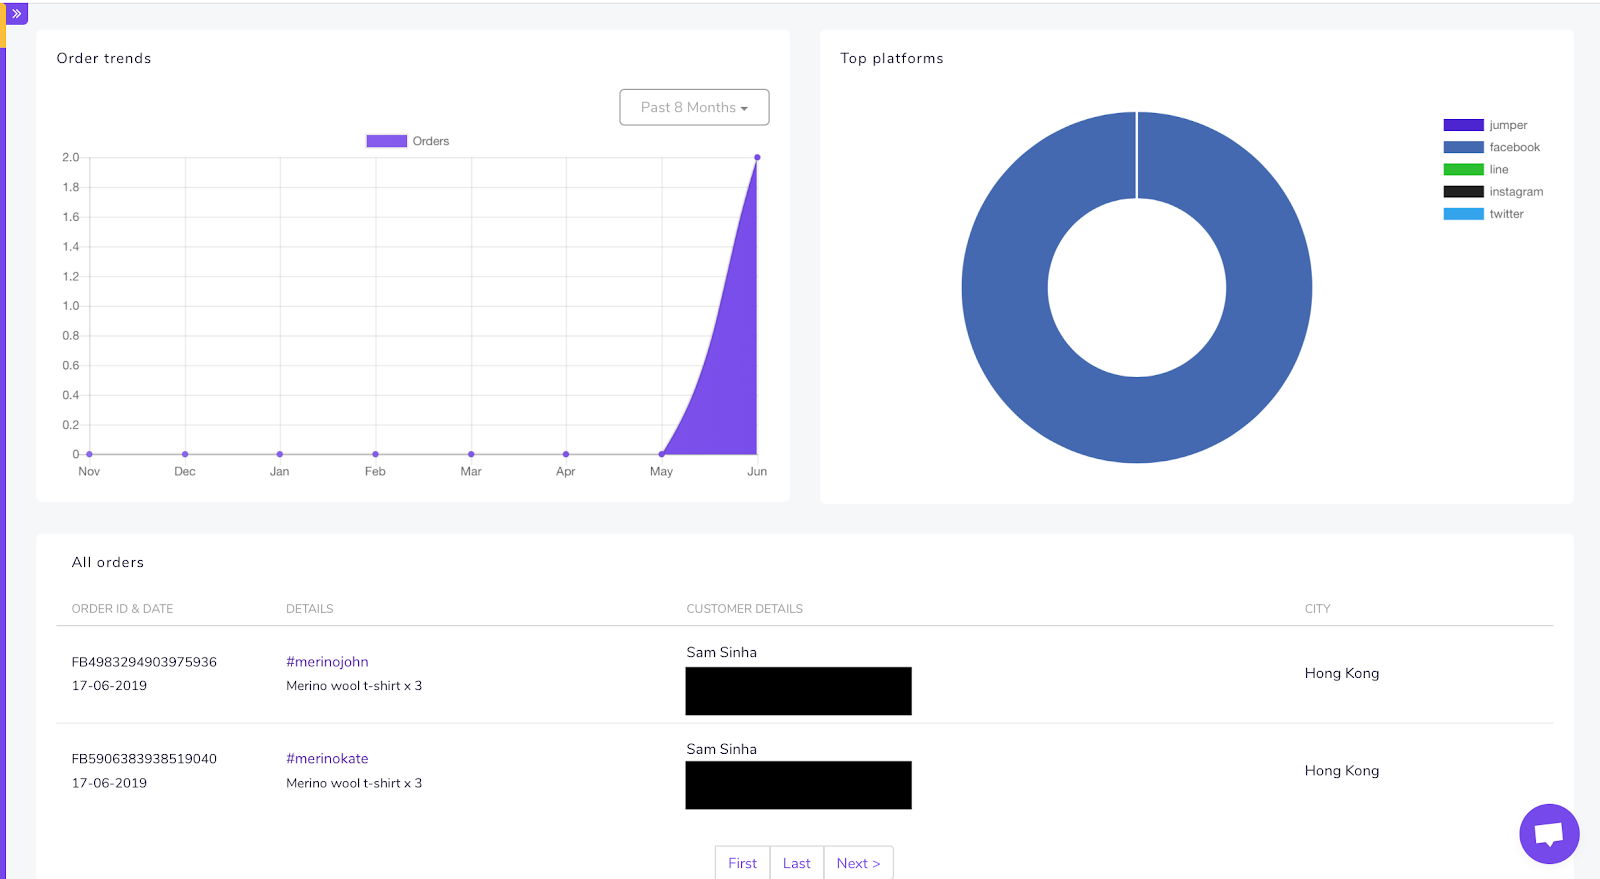
Now your campaigns are up and running, you can start to analyze the results. Jumper has a built-in analytics tool to track your campaigns. Here’s what it looks like:

This gives a good overview of your performance but to dig into the specifics of your individual influencer campaigns, head to Orders.
This will break down all the orders gained through each of your influencers’ hashtags.
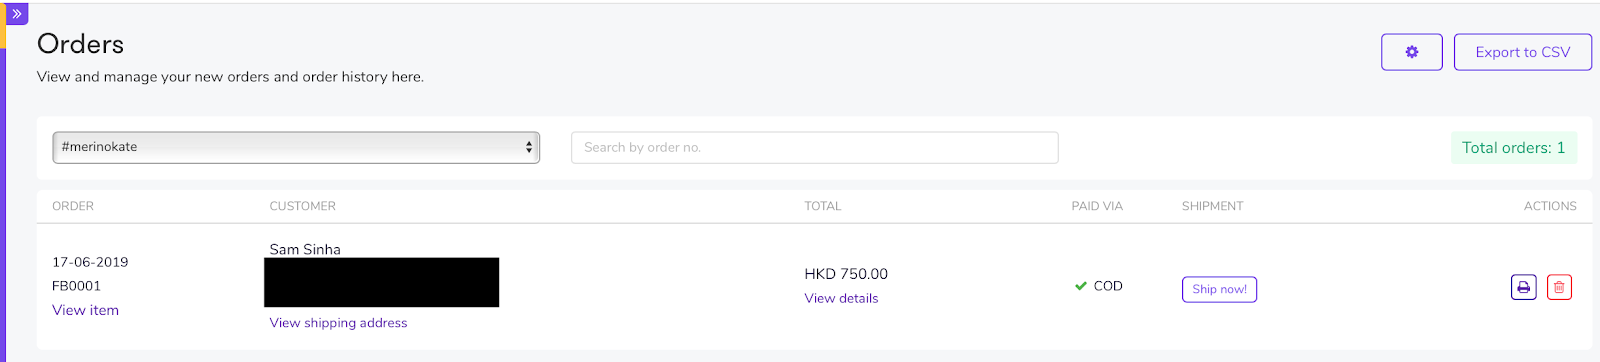
This allows you to look at exactly how much revenue each influencer has generated, and see which discount codes are the most effective.
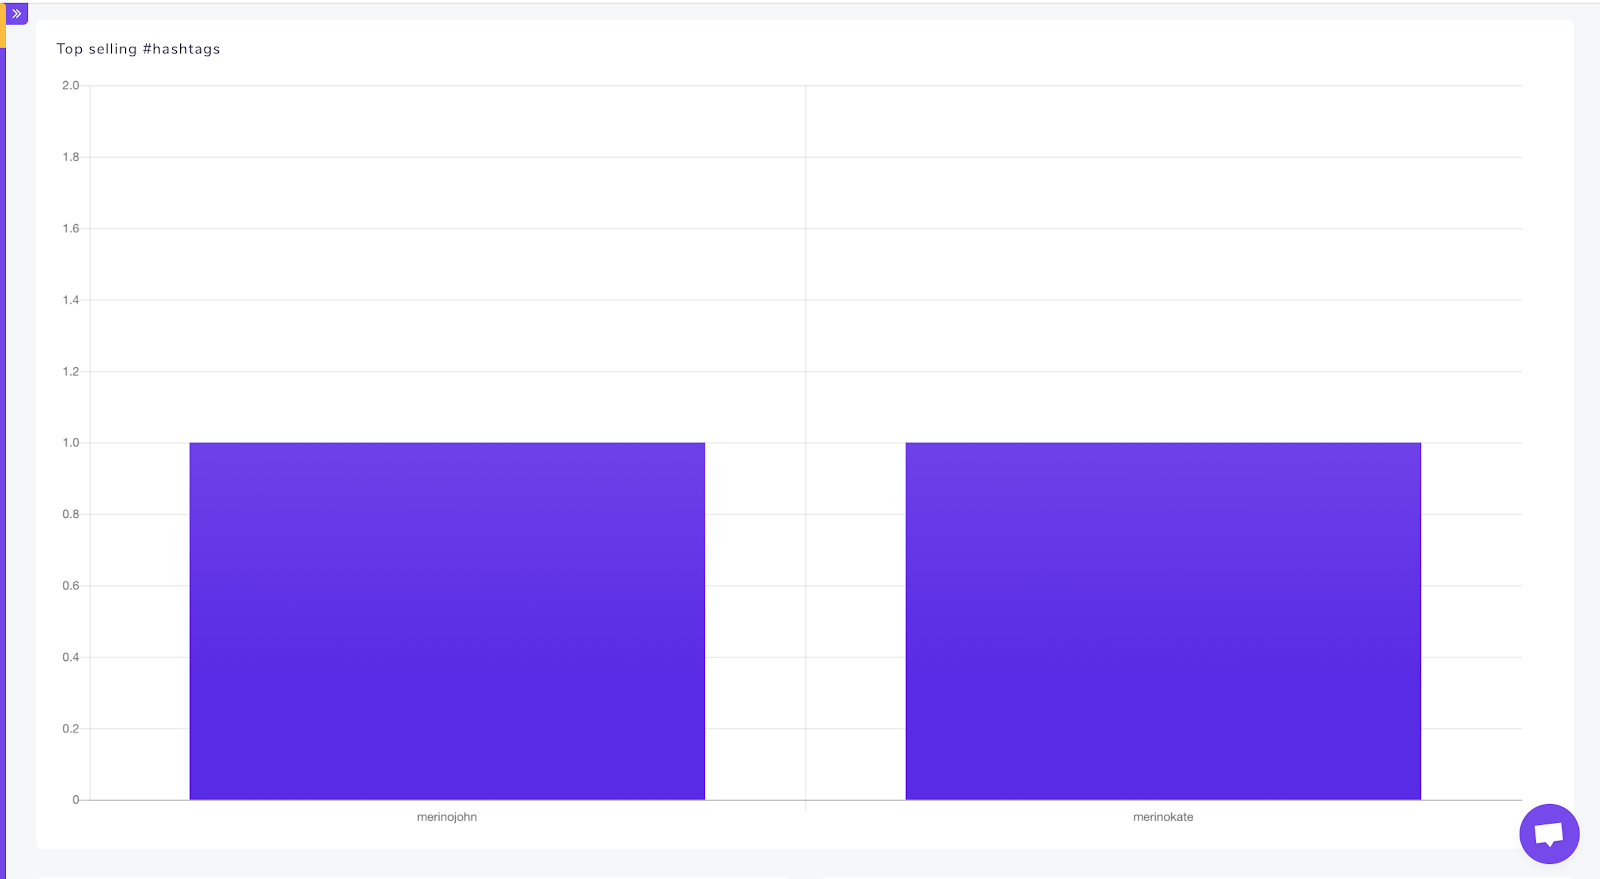
The analytics tool allows you to directly compare the performance of your hashtags in a bar chart. It’s a great way to see, at a glance, how each campaign is performing. For this example, I’ve only put through a couple of orders, but you can see how it would work with a greater volume and more hashtags.
Then head to the bottom of the page, to get a more detailed breakdown, order by order.
Evaluate Each Influencer and Iterate
In general, it’s better to run multiple short campaigns to assess more influencers and keep using the influencers who generate the best results. The shorter timeframe also minimizes the risk if the campaigns are not successful.
Once you’ve run a few campaigns, you’ll know the cost of each influencer and the revenue generated from each campaign.
A simple calculation tells you which influencers are providing a positive return on investment and which are not. By these numbers alone, you can decide you want to continue working with and who you will drop.
Once you’ve got the hard numbers crunched, you can consider some of the other factors we touched on.
Say two influencers are delivering roughly equal sales, but one of them is generating far more new followers for your own social media channels and is closer to you in terms of their brand and audience.
It would make sense to up your spend with this influencer, as the potential long-term benefits of this association are strong, along with the numbers they are generating.
The more campaigns you run, sales you make, and data you extrapolate, the more effective your campaigns. You can start to build strong relationships with your best performing influencers for even better results. This virtuous circle of testing, analyzing, and improving has the potential to skyrocket your sales.
Start Tracking Your Influencer Campaigns Today
Jumper takes the pain away from keeping track of your influencer campaigns. With influencer-specific hashtags and individual discount codes, coupled with the analytics tools in the Jumper dashboard, you can take the guesswork out of the whole process, and maximize the positive results.
Setting up your hashtags and discount codes takes minutes but has the potential to transform your ecommerce business.
Once you’re in the cycle of running successful influencer campaigns, tracking the results and making adjustments for even better results, the sky’s the limit!
If you’re new to Jumper but you’re keen to get started with influencer marketing using the tools we’ve discussed, you can sign up for a free trial and get started today!